WHY OUR OWN APP?
The fundamental flaw in most public resources we identified was the lack of Supply and Demand tracking. Often a suggested route would lead you to purchase more of an item than the destination could buy without having to wait for in game timers to refresh. With that as the foundation in mind our App was born.
https://calculator.novaintergalactic.com/
The Basics:

The home screen will present you with the options to set the following parameters to calculate the best trade route for yourself. The key elements to generating an accurate route for yourself are:
Select Ship – From the drop down menu select the ship you will be flying. This will automatically change the “Cargo Space” field to reflect the accurate amount for the corresponding ship selection.
Quantum Drive – Automatically fills in to select the default Quantum Drive of the ship identified under Ship Selection. If you have modified the drive in your ship you can select the appropriate upgrade. Doing this will then re-calibrate the results based on the new flight times.
Cargo Space – Defaults to the available Cargo Space of the Selected Ship. TIP adjust this amount if running multiple ships and you wish to see the results of the total convey.
Investment – Enter in the total capital you have to trade. NOTE This amount is reflected in multiples of 1,000 aUEC. So entering 10 is calculated as 10,000 aUEC.
Select Start Location – This feature will ensure that you can trade from your current location. You can also select “from any location” to see what the most profitable options are throughout the entire system.
Additional Filters:

For more specific route requests you can also select from the following options:
Select Final Destination – By default this is set to Generate Loop which will look for routes that return you back to your starting location allowing you to repeat the same route numerous times. You can select a specific location if you wish simply to make money while traveling from where you are to your desired location.
Trade Type – Allows you to filter how many stops are included in each trade. NOTE in the current iteration of the system each query set is run only within the selected parameter from this field. There may be more profitable runs from your starting point with more or less “Points” so be sure to check the variations for best results.
Repeatability – This option changes the risk profile of the suggested routes. As some routes have higher profit profiles but lower supply and demand the ability to repeat the loop can be adversely effected by other traders. Standard Restock Time should allow for hours of trade without running into buy or sell limits. However in times of heavy trade trade, such as after a new patch, consider adjusting this to Always Repeatable in order to better target trade routes with excess supply and demand.
Route Suggestions:
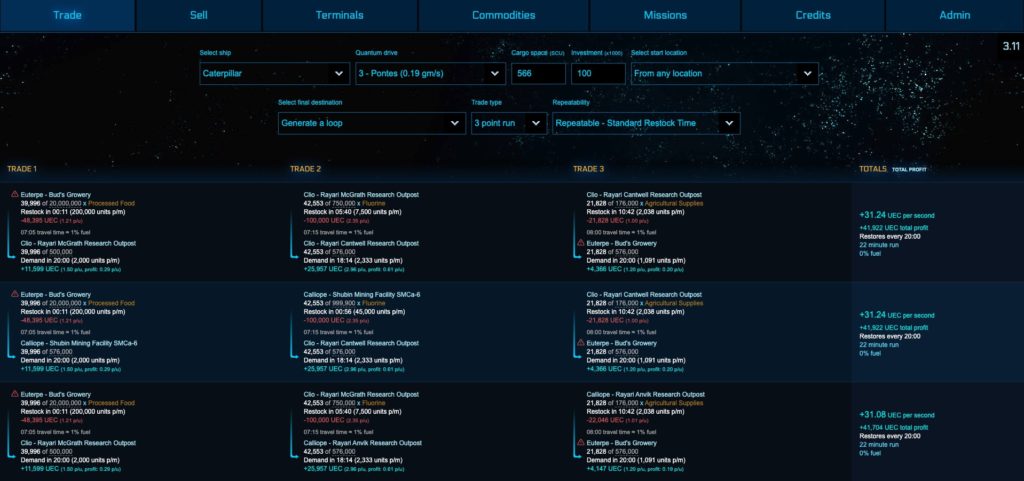
After you have supplied the calculator with your trade profile it will recommend a series of Trade Routes. The results are stacked based on what is the most profitable per second. This of course factors flight time as well as total profit of the run in an effort to maximize the money earned for your time in the verse.
Contained within the routes are the justifications and important information regarding which commodity to purchase, where to sell it, and how much of that commodity you should be buying/selling at each point in the route.
Breakdown
Starting Location: This is where you will buy your first Commodity
Commodity and Total to Buy: The left figure in WHITE is the total number to buy. Most of the time this will be amount you can afford or that your ship can hold. In some cases this will be based on the limited number of units your next destination can buy so be mindful of this number. The GREY figure is the total stock that can accumulate over time.
Restock: How quickly that location restocks enough to refill your ship. This is represented as a total as well as how many units per minute restock at the location. Be mindful of the units per min as this can help to chose the proper route during times of heavy trade such as after a patch launch.
Cost of Cargo Purchased: What the recommend amount will cost noted in RED
Travel Time: The time it will take in QT for your selected ship
Destination: Where you will sell your cargo
Commodity Total: How much of your cargo destination should be able to buy
Demand: How long it takes for the Destination to refresh its ability to purchase a full ship load of the selected Cargo, expressed in WHITE. The GREY figure is the total demand that can accumulated over time.
Profit: The amount of profit made from that leg of the trip.
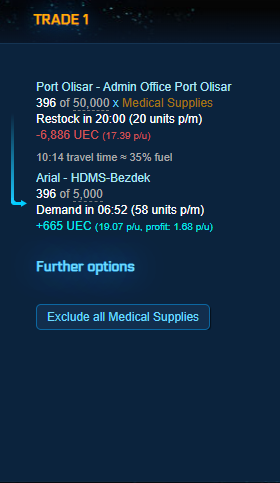
Further Options: In the instance that the recommended Cargo does not fill your hull due to demand restrictions at the destination a second cargo recommendation can be added in to increase profit. The benefit of a second cargo can vary greatly. An intermediate trader should consider using this additional feature to expand their trading prowess.
Exclude all “X” : This is a feature to eliminate that Commodity from the calculation results. It is useful for excluding illegal goods and other undesired items.
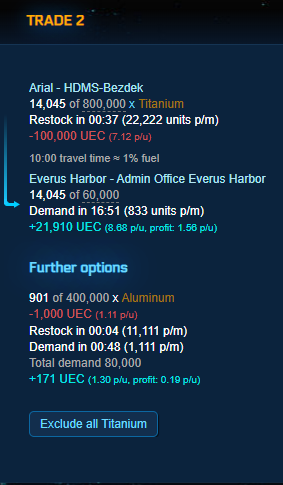
Trade Route Total
Each Trade Route is summarized under the Total Column
Profit Per Second: This is the breakdown of how many aUEC per second a route makes. NOTE if you intend to trade multiple loops during a game play session make sure to use this figure over the Total Profit figure to determine the best route for maximum profit for your time invested.
Total Profit: This is the Total Profit earned completing the Trade Route 1 time
Restore Timer: The estimated time for a Supply and Demand to recover for the selected ship. This is based on the regeneration rates highlighted from each location shown above.
Run Time: This is the total time to complete the trade route. This is inclusive of QT Times, Average Landing Times, and running to and from Trade Terminals on foot.
Sell Commodity Tab:
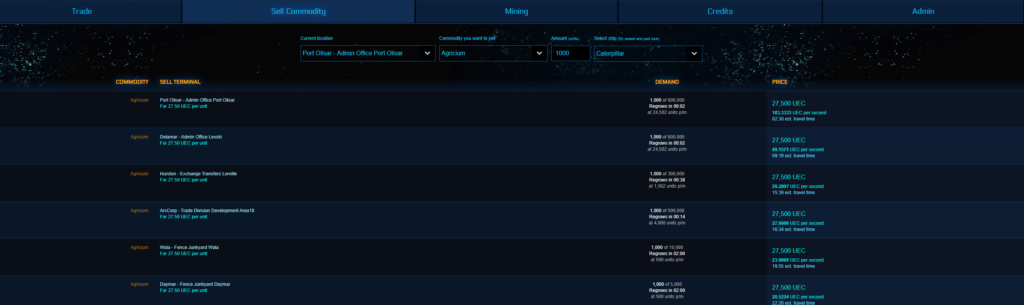
The Sell Commodity Tab at the top of the screen allows you to search for where the best destination is to sell a commodity currently in your ship’s hold. Simply provide the calculator with the required fields and it will recommend your best options to sell. NOTE the units field is expressed in single units not SCU.
Terminals Tab:
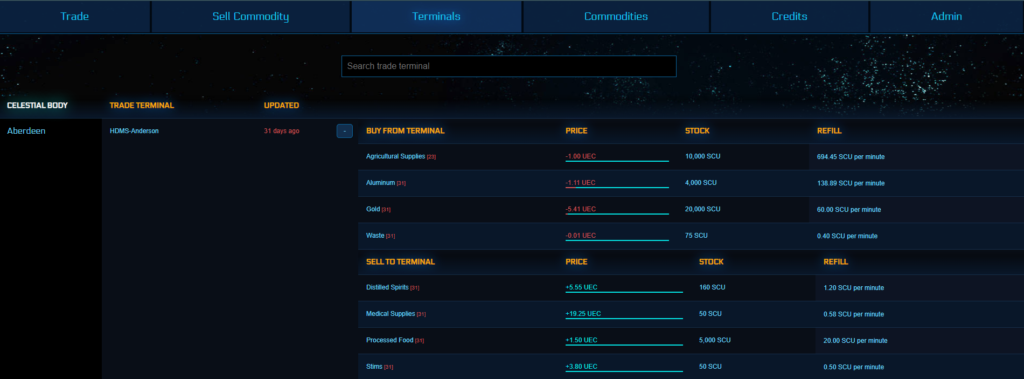
The Terminals Tab at the top of the screen allows you to see snap shot of every trade terminal ordered by location. You can view the details at each outpost by clicking the “+” to expand the trade terminal’s details. Once expanded you will see a listing of what can be bought and what can be sold to the outpost.
UPDATED: The number of days since the database was last updated regarding buy and sell prices at this location.
PRICE: A current price as last updated into the database. There is also a mouse over bar of what the min and max range might be depending on trade pressure on the economy.
STOCK: This is the maximum available units that the outpost can build up to either to buy from or sell too. This is important when planning a multiple point route as you want to ensure you do not bring more of a commodity than can be sold.
REFILL: This is rate at which each the supply or demand for each commodity replenish at the given location. This figure can be invaluable when trying to find repeatable trade routes without need to wait for refill timers.
Commodities Tab:
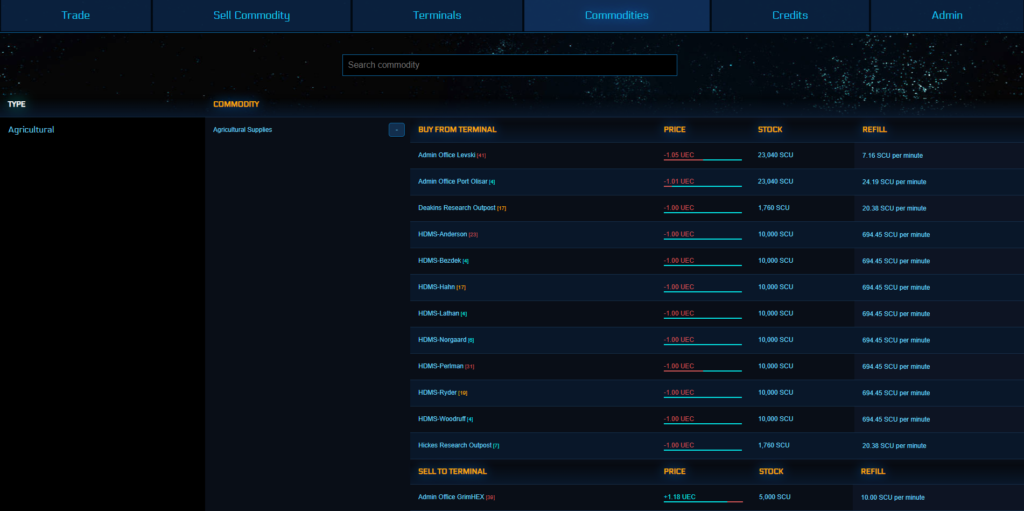
The Commodities Tab works much like the Terminals Tab. The key difference is that the filtering is done by commodity type not by location. Again clicking on the “+” will expand the details under that commodity to get a list of where that particular commodity can be bought and sold.
TIP – This tab is very useful in heavy trading pressure situations as you can quickly get a snap shot of a chosen commodity to see where the best profits and supply / demand rates are.
PRICE: A current price as last updated into the database. There is also a mouse over bar of what the min and max range might be depending on trade pressure on the economy.
STOCK: This is the maximum available units that the outpost can build up to either to buy from or sell too. This is important when planning a multiple point route as you want to ensure you do not bring more of a commodity than can be sold.
REFILL: This is rate at which each the supply or demand for each commodity replenish at the given location. This figure can be invaluable when trying to find repeatable trade routes without need to wait for refill timers.
Missions Tab:
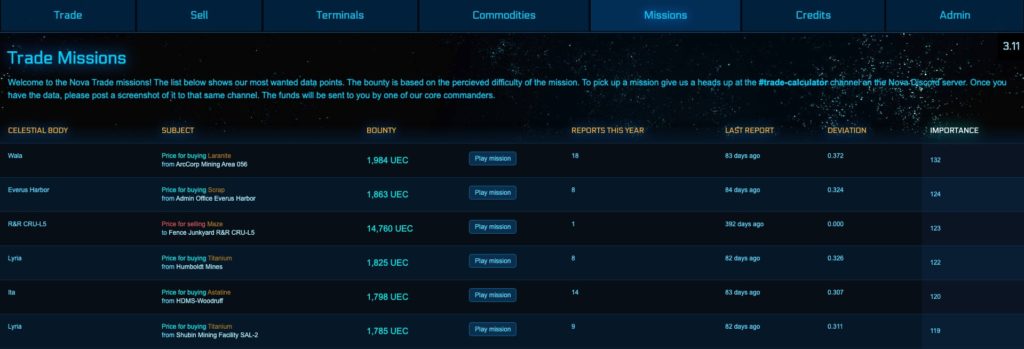
The missions tab was created as an excellent way to engage and reward those members who are committed to maintaining the accuracy of our data set. The system automatically prioritises which commodities have the greatest fluctuations and therefore need the most upkeep.
NOTE: You will need to take a screen cap of the data and report it to #trade-calculator channel on the NOVA Discord in order to collect your bounty.
Celestial Body: The Planet or Moon that the report originates on.
Subject: First line will tell you if you are checking the Buy or Sell price for which Commodity type. Second line will give the specific outpost for the report.
Bounty: The aUEC that NOVA Core will pay for this report.
Play Mission: Will allow you to accept the mission.